Introduction
Tutorials
Improving a discharge simulation
Importing takes a PC file of numbers (usually text) and adds it into a dataset. For example, you can import measured depths, pressures and temperatures into a measured discharge profile dataset. The file to import can be created by other PC applications (including this application itself) or by field instruments.
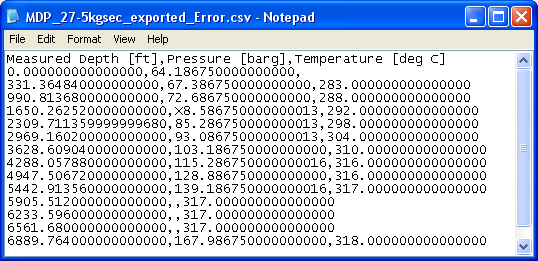
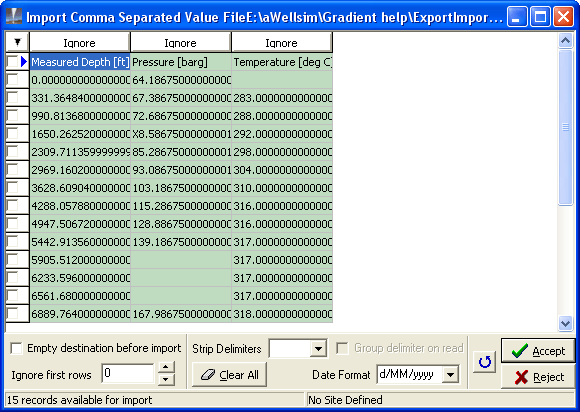
This section will step you through a typical import, of this comma separated value file:
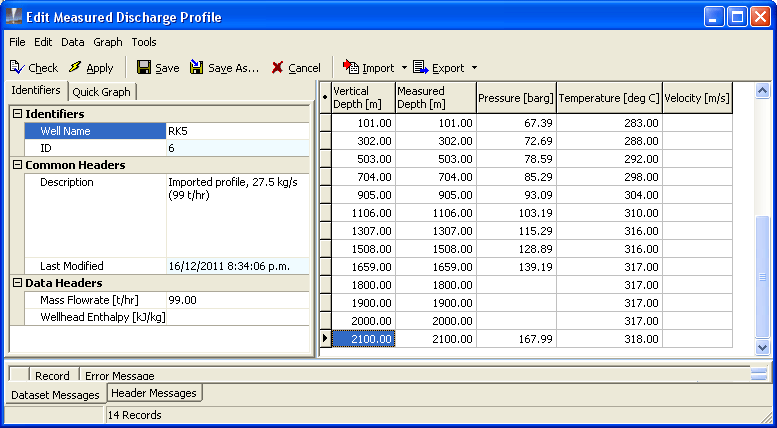
to this measured discharge profile:
Note that the comma separated value file above has an error in line 5: the pressure is X8.58675 but it obviously should be 78.58675.
The file has rows of data, one for each row in the data set. The file does not have single data items such as the flowrate for the discharge; you must know this separately.
The each row in the file can have a different number of items to the number in the data set. In the above data file, there are three items per row (Vertical depth, Pressure and Temperature) and this is imported into a data set with five items per row (Vertical depth, Measured depth, Pressure, Temperature and Velocity). Measured depth and Velocity are set to empty. Also, a file to be imported can have more items per row than the data record (the extras will be ignored).
The data in the file can be in any units. The file above has vertical depth in ft, while pressure and temperature are in metric units. Units can be converted on import.
The above file was exported by the export module, which helpfully added the first line saying what the data in the file is, and its units. A line like this is not necessary, and if it is not present, you must know this separately.
There can be errors in file to be imported. For example, in line 5 in the above file the pressure is X8.58675 but it obviously should be 78.58675.
Comma separated value Use this format to import data from a spreadsheet. The file extension is .csv.
Space separated value The file extension is .ssv.
Tab separated value Use this format to import data from a word processor. The file extension is .tsv.
Clipboard You import data from the Windows clipboard that you have earlier pasted from another Windows application.
Fixed Format A space separated value file. ??
Borland Paradox
Microsoft Access
General ADO
Click the data type to import (for example Measured discharge profiles), then click Data, then click New:
![]()
Either click the  just right of
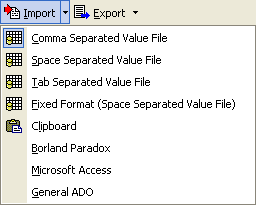
  and choose a format from the menu:
Or hover the mouse over  and look at the default format in the yellow tool tip that appears. If this is the format you want, click .
Some import options have special procedures:
For the other import options, an Open file window appears. Navigate to the folder containing the file to import, click the file name and click Open. The import setup window appears.
The import setup window has the values in the file arranged into rows and columns, for example:
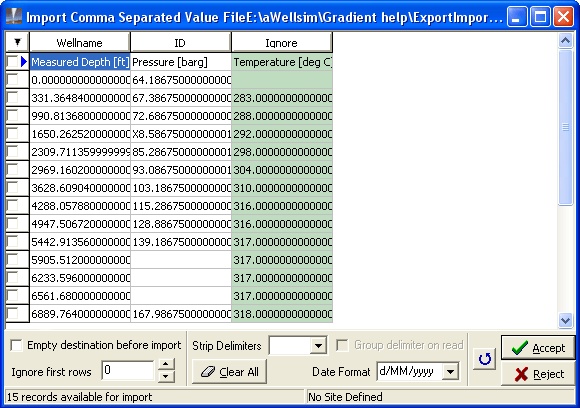
Each column has a field name and optional unit at the top:
The field name is the field name in the empty data set that the values will be imported to. For example, values under the field name Measured Depth will be imported to measured depths in the data set.
If the field name requires a unit, then it will appear beside the field name. Note that this unit should be the unit of the values in the file being imported, not the units in the empty data set that the values will be imported to. Some field names do not need units, for example Wellname and ID. The import will automatically convert the units in the file being imported to the units of the empty data set.
The first line of the file we are importing in this example has the field names and units of the numbers in the columns. This is because it was exported by the export module. However, files you get from other sources might not have a line like this, in which case you must know the correct field names and units separately.
When it starts, the import module guesses field names and units, based on what you selected last time you imported. In this case the module has guessed badly, and all the field names above are wrong - compare each field name in row 1 with the correct name in row 2.
Ignore is a special field name, which tells the import module to ignore that column of data during the import. If the file has columns that you do not want to import, set them to Ignore. For example, a measured discharge profile might have values for turbidity at each depth, and you can not import turbidity into this empty data set.
The first time you import, all field names are set to Ignore by default.
Now, finally, set the field names and units to their correct values:
If the guesses for field names are wrong, then first click ![]() to set all field names to
to set all field names to Ignore:
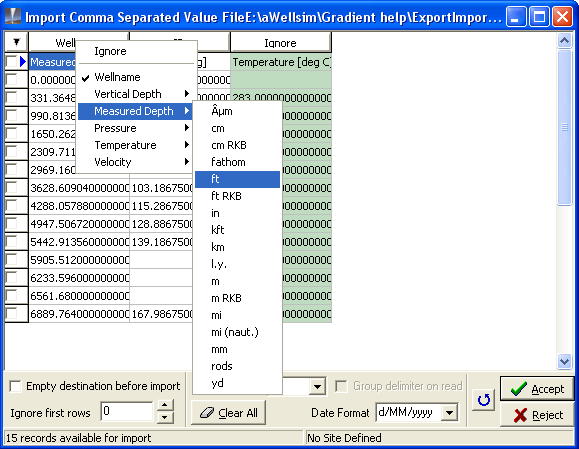
Change the field names and possible units to their correct values: For each column you want to import, click the field name and click the correct name in the menu. If the name in the menu requires units it has an arrow head; move the mouse to the right and click the correct units (the units of the number in the file, ft), for example:
Change all field names to their correct values and units, to end up with:

When you are assigning field names to the columns, you must click NON-VISIBLE COLUMNS to choose fields that are not currently visible in the header window:

If you select one of these fields, WellSim reminds you that the field is not visible. To make the field visible see here.
For this example do not select any options:

 The export module will delete any numbers already in the data set before it inserts the imported numbers.
 No numbers deleted.
Enter a number of rows of the file to ignore. If the first row of the file has the field names and units, as in this case, then normally set this to 1. However, we will not do that in this example.
If you added delimiters when you exported the file, then choose the delimiter from the dropsdown list, so the import module can remove it.
??
Does not
Click ![]() to set all field names to
to set all field names to Ignore.
If you are importing a date field, then select the format from this dropdown list, so the import module can import it correctly.
This option is to handle unexpected separators in the data you are importing. If your Windows Region and language has your thousands separator as a , and your decimal separator as a . then the options are:
Ignore all , Usually choose this option. The data you are importing should not have any thousands separators, and choosing this option removes any thousands separators, so the data imports properly.
Error if , Give an error if the data has any , as a thousands separator.
Replace with . If the data has any , as decimal separator, this will replace them with the correct ..
In this example I have put errors in the file being imported, to show how to correct them. Normally there need not be errors.
Click  to start the import. The window displays errors on two lines:
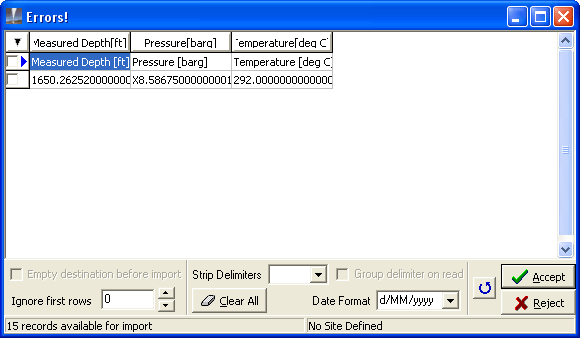
The error in the second line is the X in the pressure. Change the X to a 7.
Click again. The window displays an error on one line:

The error is that the line 1 of the file being imported does not have numbers, as the import module is expecting, instead it has the field names. We don't need to import line 1, so click  to stop importing.
NOTE We could have avoided this error by setting the option Ignore first rows to 1.
The import module returns to the data set, now with values of vertical depth, pressure and temperature. The vertical depths have been converted from ft to m.
Enter a description Imported profile, 27.5 kg/s (99 t/hr).
Enter a Mass flowrate 99 [t/hr].
Click  to check the data, calculate vertical depths and order the values by vertical depth.
The result is this measured discharge profile: