
Introduction
Tutorials
Improving a discharge simulation
Normally you run WellSim from its graphical user interface: you start WellSim by double clicking the icon on the desktop, then use the mouse to select options and enter data from the keyboard. This tutorial introduces how to run WellSim another way, from the command line:
The advantage of running from the control line is that WellSim will run unattended. You would typically do this from another program, which would write the input files, run WellSim, then read the result files. For example, if you are doing a reservoir simulation using another program you could use this other program to run WellSim from the command line to:
You can:
At present you can not:
In the input and result files:
The units must be WellSim's default units (that is, set by loading a default unit set or by setting units individually); do not right-click a field and change the units.
For example, for a geometry file, if the default unit is metres, then enter Inner Diameter, Outer Diameter and Roughness as metres too. If a dimension is 24 centimetres, enter 0.24 metres. Do not right-click the field, choose centimetres and enter 24. Right-clicking the field and changing the units is a common source of error.
The decimal symbol (. or ,) is what you have set in the Windows control panel, Region and Language (this is the symbol you see in WellSim when you run it normally).
Some command line files are stored in WellSim's settings folder read more. To see the settings folder from WellSim, click Tools, then Open settings folder.
Use a text editor, such as Windows Notepad or Notepad++, to create the required text files and to look at the result files.
When you install this version of WellSim and first run it, it creates example files for you to use as templates to make your own files and to test running WellSim from the command line:
This tutorial uses the example files:
Start WellSim normally and set the default units to those required for the example files: In WellSim, go to Tools > Unit preferences. In the UnitTypes tab, set Sets to Metric, then set the units for Pressure to bar abs.
Then, either run WellSim from the Windows Start menu:
"C:\Program Files (x86)\Gradient\WellSim4\wellsim" -b and type CTRL+C to copy it.Start on your keyboard.CTRL+V to paste the path.Enter.Or run WellSim from a batch (.bat) file:
"C:\Program Files (x86)\Gradient\WellSim4\wellsim" -b and type CTRL+C to copy it.CTRL+V to paste the path.The screen will flicker as WellSim runs.
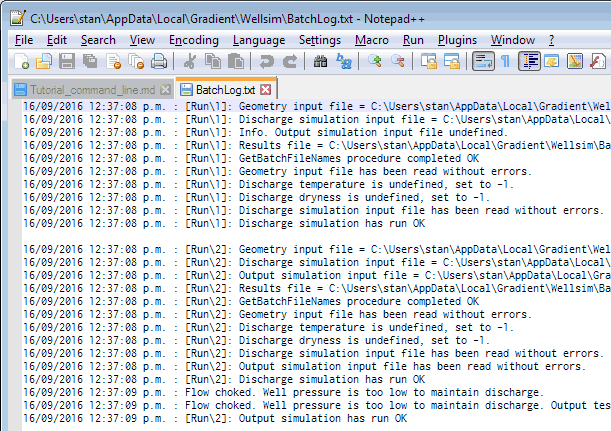
Use a text editor to open the log file BatchLog.txt in WellSim's settings folder in. You should see a message that two simulations have run properly. If you dont, check you have
Use a text editor to open the result files (for example RK5Results1.csv is in the folder BatchFiles in WellSim's settings folder). You can also open a csv file in a spreadsheet.
Use WellSim's example files as templates for writing your own files.
To specify the input and result files for each run, create a file called BatchFiles.ini. This must be in your WellSim settings folder see here. A typical BatchFiles.ini file is:
| . | |
|---|---|
| [Files] | |
| NumberOfRuns=2 | The number of runs to do |
| [Run\1] | Section for first run, a discharge simulation |
| Geometry=BatchFiles\RK5Geometry.ini | - The geometry input file to use |
| Discharge=BatchFiles\RK5InputDS.ini | - The discharge simulation input file to use |
| Results=BatchFiles\RK5Results1.csv | - The result file to use, here a csv file |
| [Run\2] | Section for second run, an output simulation |
| Geometry=BatchFiles\RK5Geometry.ini | - The geometry input file to use |
| Discharge=BatchFiles\RK5InputDS.ini | - The discharge simulation input file to use |
| Output=BatchFiles\RK5InputOS.ini | - The output simulation input file to use |
| Results=BatchFiles\RK5Results2.ini | - The result file to use, here an ini file |
Note:
NumberOfRuns=1 and [Run\1].To do an output simulation, specify four files: a geometry, discharge simulation, output simulation and result. An output simulation always does a discharge simulation first, which is why you need the discharge simulation file.
For each file, enter its path:
A full path starts with /, starts with \ or has a : as its second character. All other paths are relative.
The input files can be in any folder and have any name, as specified in BatchFiles.ini.
An input file can be used for more than one run, for example you only need one geometry file per well.
The values must be in WellSim's default units and decimal point symbols must be what you have set in the Windows control panel, Region and Language. For example, if the default unit is metres, then ensure all dimensions in the file are in metres as described here.
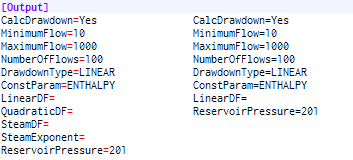
Lines of a file have field=value pairs. If a value is unused, either leave the value empty or delete the line with the field. For example, the two files below are equivalent:
In a discharge simulation, you specify two values of pressure, enthalpy, temperature and dryness. For the values that you don't specify, either set the value to -1, leave the value empty or delete the line with the field. For example, the two files below are equivalent:
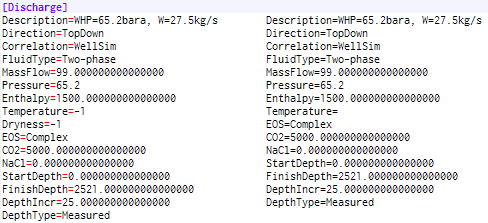
The example files installed by WellSim have all possible fields present.
When WellSim runs from the command line it creates a log file, BatchLog.txt, in WellSim's settings folder, with any errors that WellSim found. For example:
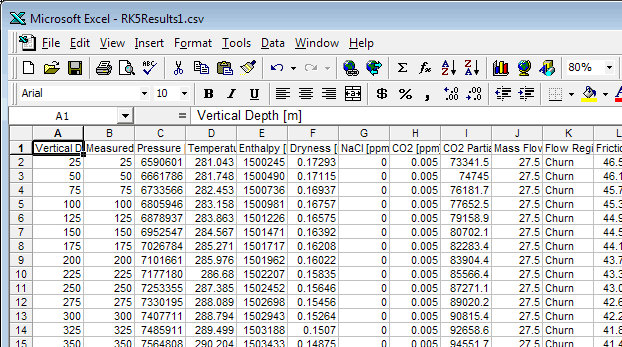
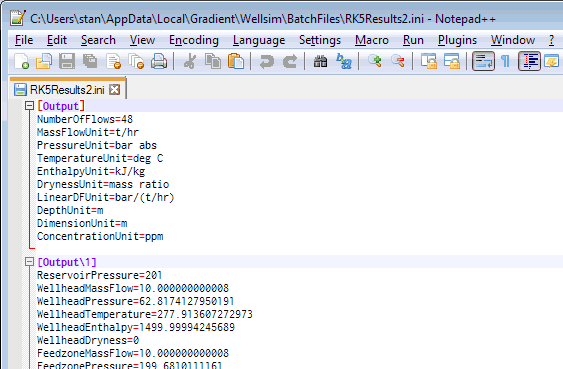
When WellSim runs from the command line it creates a result file for each run:
The result data for a run from the command line is the same as the result data from when you run WellSim normally. For example, the result file of a command line output simulation does not include the result of the required intermediate discharge simulation.
A result file extension must be:
either .csv, which creates a csv result file; you can open this with a spreadsheet, for example:
or .ini, which creates an ini result file; this has the result as field=value pairs, for example:
When you use an external program to run WellSim, if the path name has spaces then surround the path name with double quotes, for example "C:\Program Files (x86)\Gradient\WellSim4\wellsim" -b. Ensure you don't change the ordinary double quotes in the path to 'smart' ones (6s and 9s) by mistake.