Introduction
Tutorials
Getting familiar with GeoData Manager
Changing how GeoData Manager looks
Scenarios for using GeoData Manager
Data types and nodes
Help with data types and nodes

Getting familiar with GeoData Manager
Changing how GeoData Manager looks
Scenarios for using GeoData Manager
Help with data types and nodes
When you export, GeoData Manager writes the data as text. You can export:
From the main window, header window:
From the main window, detail tab: Export the selected dataset's identifier and detail data.
While editing a dataset: the dataset's identifier and detail data.
You can later import the exported file into a compatible PC application (including GeoData Manager itself). You can export to these standard text file formats:
| Format | Extension | |
|---|---|---|
| Comma separated value | .csv | For exporting to a spreadsheet |
| Space separated value | .ssv | |
| Tab separated value | .tsv | For exporting to a word processor |
| Clipboard | After you export data to the Windows clipboard, you can later paste it into a compatible Windows application. | |
| LaTeX file segment | .tex | LaTeX is a typesetting language for scientists and academics. It is open-source and readily available. |
| XML file | .xml | xml is a standard format for representing text data |
Navigate until you see an Export button.
Either click the  to the right of the
 Export button and choose an export file format or just click the Export button. If you hover the mouse over the Export button to see the default file format you will get if you click the button.
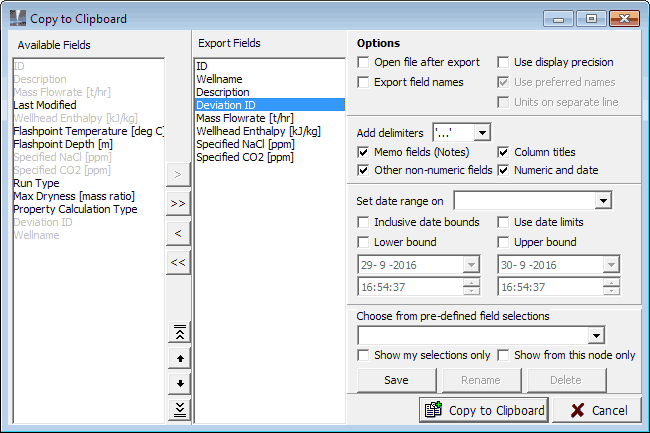
The export window is displayed.

In Available fields, Ctrl+click field names to export, then click  to move the fields to
 Export fields.
Usually the default options are fine.
Click Save to file or Save to clipboard to export the data. Save to file will ask you for a folder and file name for the export file.
Open the file in a text editor to see the data.
The export window has two lists:
Available fields lists all fields (including any hidden fields) that can be exported. If they are selected for export they are greyed.
Export fields lists the fields currently selected to be exported. The order of exported fields is the order down this list.
To choose fields to export, move them from Available fields to Export fields:
| To do this ... | do this |
|---|---|
| To choose all fields | Click  |
| To choose one field | Double click the field in Available fields, or click the field in Available fields, then click  |
| To unchoose all fields | Click  |
| To unchoose one field | Double click the field in Export fields,or click the field in Export fields, then click  |
| To change the order of the exported fields | Click each field to reorder in Export fields, then click  , ,  , ,  or or  |
Note
To select a range of fields, click the first, then Shift-click the last.
To select several fields, click the first, then Ctrl-click the rest:
GeoData Manager remembers the order you select them, and moves them in this order when moving into Export fields. To deselect a field, Ctrl-click it again.
The export window lets you select several options for the export, for example:

Open file after export
 When the export application has finished, Windows will try to open the exported file with an appropriate Windows application (a spreadsheet for comma separated value files, Notepad for space separated value files, a word processor for tab separated value files). Windows decides which application to use from its file associations.
 Will not open the file.
This option has no effect on Copy to Clipboard.
Export field names
 The export module will write the exported field names and their units as the first line of the exported file.
 No fields are written.
Use display precision
 Values will be exported with the precision currently in use in the program.
 Values will be exported with their full precision.
Note If you will import the file into GDManager, WellSim or a numerical analysis application, do not tick this option, or you will loose accuracy.
Use preferred names
If Export field names is  then:
then:
 The export module will export the preferred field names.
 The export module will export the default (English) field names.
The field names are as in Unit preferences.
Units on separate line
If Export field names is  then:
then:
 The field's unit name will appear below the field name, for example:
| Field 1 | Field 2 | Field 3 |
|---|---|---|
| Vertical depth | Pressure | Temperature |
| ft | barg | deg C |
 The field's unit name will appear after the field name, for example:
| Field 1 | Field 2 | Field 3 |
|---|---|---|
| Measured Depth [ft] | Pressure [barg] | Temperature [deg C] |

GeoData Manager inserts a delimiter (or separator) character between each field in a text file that it exports. This character marks where one field ends and the next begins. There can be problems with delimiters:
If a delimiter character appears within the field itself, for example if the separator is a comma and a comma appears in a text field.
Different countries use different conventions for the decimal symbol and the separator in a csv file (for a spreadsheet):
| Decimal symbol | Usual csv separator |
|---|---|
. dot |
, comma |
, comma |
; semicolon |
Choose the delimiters to use from the dropdown list. Usually Auto is best because it will handle all the above problems properly. The options are:
Auto delimiters
Exporting to the clipboard: If the field has a Carriage Return / Line Feed (possible in a Memo field) then:
" exist in the field, these are doubled, to "".".Exporting to a csv file:
If the field has a Carriage Return / Line Feed (possible in a Memo field) then:
" exist in the field, these are doubled, to "".".If the field has no Carriage Return / Line Feed and has a csv separator in the field (, or ; depending on the setting for the decimal symbol in Windows' region and language settings) then:
" exist in the field, these are doubled, to "".".'...' or "..." delimiters
GeoData Manager applies the delimiter to the the fields of the kinds you select (Memo fields, Column titles, Other non-numeric fields, Numeric and date).
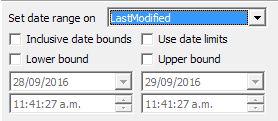
If the exported data has one or more date fields, then you can specify a range of dates to include in the export.

This option lets you specify two values of date/time, called the lower and upper bounds. Then, if the data you are exporting has a date/time field (in Available fields) you will export only the data that is:
Set date range on
Select from the dropdown list the date/time field (from Available fields) to use to select for date and/or time. This field does not have to be in Exported Fields. If you do not choose this field, then all data will be exported.
Inclusive date bounds
If you specify a lower or upper bound:
 If the data's date/time is exactly equal to the lower or upper bound then the data will be exported.
 If the data's date/time is exactly equal to the lower or upper bound then the data will not be exported.
Use date limits
 The lower and upper bound dates and times will be automatically set to the oldest and youngest dates and times in the data you are exporting. You can change these later.
 No bounds set.
Lower bound
 Use a lower bound. Enter a date and time for the lower bound in the two boxes below.
 Do not specify a lower bound: the lower bound is effectively the start of time.
Upper bound
 Use an upper bound. Enter a date and time for the upper bound in the two boxes below.
 Do not specify an upper bound: the upper bound is effectively the end of time.
If you don't use an upper bound or a lower bound then you will export all the data.
Other export formats have more options, for example for export to LaTeX:

You can save groups of export fields so you can easily repeat an export without needing to select fields each time.

Saving a predefined group
In the export window, move the fields you want to the Export fields list.
Click Save. Enter a name for the new group and click Ok.
Using a predefined group
Select a predefined group from the dropdown menu. GeoData Manager loads the group's fields into Export fields. By default, the dropdown list shows all predefined selections. Tick Show my selections only or Show from this node only to restrict the selections in the dropdown list.
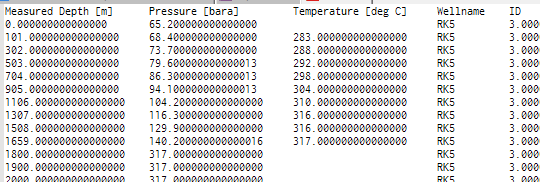
This is a typical exported file displayed in a text editor:

The file is a text file of lines of data, one from each row in the data being exported.
The file might not have all the data you need, for example if you export a dataset from the edit menu it has the identifiers but no other header data.
The units of the exported fields are GeoData Manager's current units (that is, set by loading a default unit set, by setting units individually or by right-clicking on a field read more).
The export module helpfully adds a first line saying what the fields in the file are, and their units.