Introduction
Tutorials
Getting familiar with GeoData Manager
Changing how GeoData Manager looks
Scenarios for using GeoData Manager
Data types and nodes
Help with data types and nodes
Getting familiar with GeoData Manager
Changing how GeoData Manager looks
Scenarios for using GeoData Manager
Help with data types and nodes
GeoData Manager has over 150 data types, and you will enter a large number of data sets of different data types. GeoData Manager has a comprehensive set of tools to simplify selecting one or more data sets to work with. For example, to select downhole pressurements made on a certain date in order to graph them.
To select data sets to work with:
1 - Choose the data type of the data sets that you want to work with.
2 - Select that data type in GeoData Manager: navigate through the database tree and click on that data type.
3 - Select the data sets to work with using one or more of these tools:
4 - Now you can work with the selected data in one of three ways:
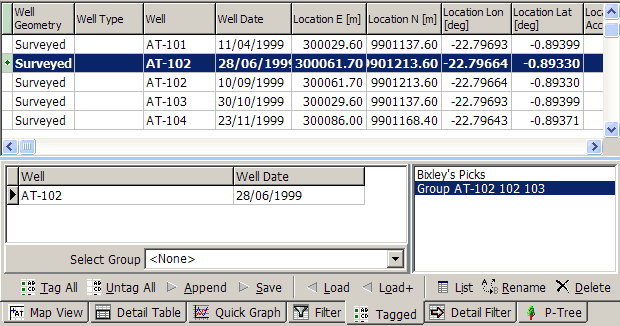
To just look at the data set, click its row in the header window. It is now selected and turns blue. Click the Map View, Detail Table or Quick Graph tabs to see the detail data in different ways.
To edit the data in the data set (or to create a new data set), right click its row and choose from the popup menu read more.
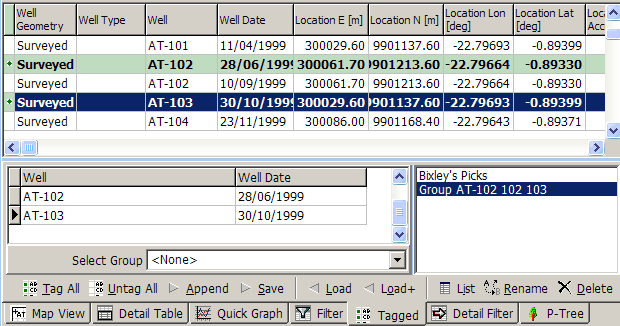
To output the data sets (for example, Multiple graph, Export or Map), the data sets need to be tagged. Often selecting the data sets leaves them tagged already, but, if they are not, double-click the selected data set(s) to tag them. Or click Tag All to tag all the selected data sets. Tagged data sets are green. Here one data set is tagged; the blue data set is selected but it is not tagged:

If you select a large number of data sets to work with then expect GeoData Manager to slow down as it processes them.
5 - When you have finished, click Untag All.
Note There are some preferences for selecting data see here.
The data types are displayed in the database tree in the home window. Each line on the tree is called a node. A node is either a data type or a category of data types, for example:
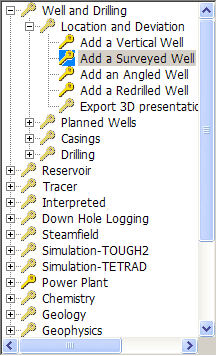
1 - Show or hide nodes until you see the data type you want to work with. Options are:
Double-click a node or click the + in front of a node to show the node's sub-nodes.
Double-click a node or click the - in front of a node to hide the node's sub-nodes.
Click File, then click:
Expand current node to show any sub-nodes of the current node
Collapse current node to hide any sub-nodes of the current node
Expand all tree nodes to show all database tree nodes
Collapse all tree nodes to show just the major database categories
2 - Click the data type you want to work with.
Find the first data set in the header window; scroll up and down if necessary. Click the Map View, Detail Table or Quick Graph tabs if this helps to find the data set.
If you only want one data set then you are done. If you want more then you need to tag the data sets. Tag that first data set by double-clicking it. To show it is tagged, a green dot turns on at the left end and the whole row turns green (as you will see when you click a different row):
Repeat the two steps above until you have tagged all the data sets you want to use.
To see what you have tagged, click Select (Tag), then Show current dataset selection.
To untag a data set, double-click it again.
Click Tag All or Untag All as required.
If you need to select many data sets or if you have many data sets to select from then scrolling and tagging like this becomes cumbersome. One of the other tools described in this section might be better to select the data sets, or to make an initial selection for you to scroll and tag. You can tag data sets in the header window at any time.
If you have many datasets then it can be confusing knowing which you have tagged. To see these, click View in the main menu bar, then click Show datasets currently tagged:
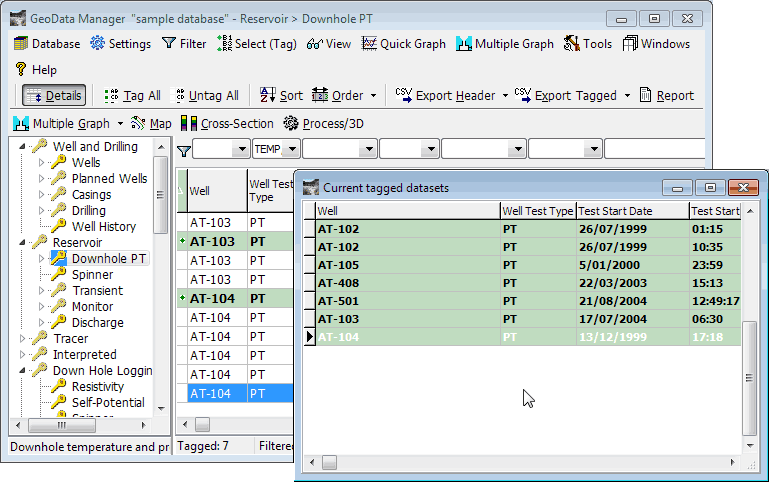
To dismiss the window, click the X at the top, right.
The filter bar is at the top of the header window. Use it to select data sets whose header fields match the criteria you enter into the filter bar. For example, you can select wells drilled after a given date that are less than a given depth.
Before working with the detail field select the required data type. For this example, I selected wells at Location and Deviation.
Note Filtering untags any tagged data sets. If you want to save tagged data sets before filtering, save them as a tagged group first.
This example shows filtering by Well Date:
Choose a date from the dropdown list in the filter bar above Well Date, then press Tab. The header window displays wells with that date:

The field in the filter bar is a soft lookup, so you can type anything there. You could have just typed the well date above. Now, select that date and type >= in front, then press Tab. The header window displays wells with that date or after:
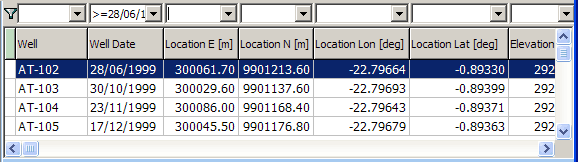
The Filter tab shows what you are filtering by.
You could now click Tag All to tag these data sets.
| Option | Enter into filter bar field |
|---|---|
| Single | type in a value or select from the dropdown list to the right of the filter bar field: eg AT-101 selects only AT-101 |
| Multiple | type in successive values separated by commas, or select them sequentially from the drop-down list: eg AT-101,AT-103,AT-104 selects AT-101, AT-103 and AT-104 |
| From dropdown list | see here |
| Turn off one filter | double-click the field in the filter bar, press Delete, then press Tab. |
| Turn off all filters | Click Filter and click Default Filter (usually) or No Filter see below |
| From a site group | see here |
| Not | precede a criteria with the word NOT (upper-case): eg NOT AT-1 selects all except AT-1 |
| Upper or lower bound | precede a value by >, >=, < or <=: eg >= 1/01/2012 selects all dates after 31 December 2012. |
| Range | separate the individual rules by a comma: eg >= 1/01/2012, <= 31/12/2012 selects all dates in 2012 |
| Wildcard | an * matches any number of any characters: eg *A*1* selects all with an a followed by a 1: AT-1, AT-101, AT-11 read more |
Not
Range operators can be used for alphanumeric fields as well as date and floating number fields.
The NOT operator cannot be used in conjunction with any other criteria in a filter bar field.
Wildcards and range operators can be used in the same filter bar field.
GeoData Manager ignores the case of letters you type into the filter bar.
The default filter selects data sets normally shown at that node, for example in Well and Drilling, Location and deviation and the sub-nodes like Add a Vertical Well all show well data:
The default filter for Locatian and Deviation has all fields in the filter bar blank, to show all the wells.
The default filter for Add a Vertical Well has VERTICAL for the field Well Geometry the filter bar to select vertical wells.
The data sets at the nodes Reservoir and Steamfield use the same database tables (header in table wtdiary, detail in table welpres) and it is the default filter at either node that selects data sets appropriate for the node: the default filter for Reservoir selects development data sets and that for Steamfield selects production data sets. To see both development and production data sets, navigate to either Reservoir or Steamfield and select No filter.
You can customise how the filter bar dropdown lists work, to suit your way of working. Click Filter and use the flyout menus for menu items Filter dropdown ... and Filter ...
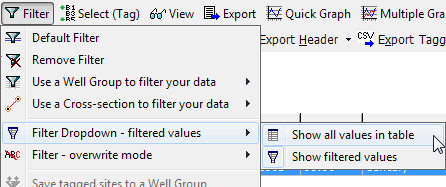
This controls what you see when you click a dropdown list. The options are:
All values:
Filtered values (default):
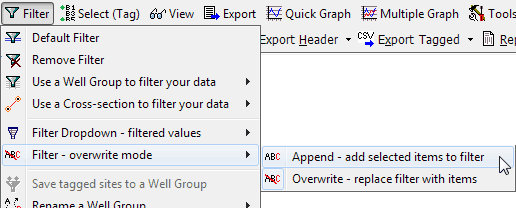
This controls what happens when you click an item in dropdown list. The options are:
Append:
Overwrite (default):
At the Map View tab you can select and deselect wells to add them or remove them from the well field of the filter bar see here.
The above described entering rules into the filter bar by hand. You can also enter rules by using a filter group.
A wild card in the filter bar is an *, which matches any number of any characters in an alphanumeric (text) field.
At node Geology: Core Register - By Section, Petrological and Physical Analyses are alphanumeric values. You can put the wildcard in the middle like this, to get all rows with Petrological Analyses = DATING and TSPEC:

Don't get the order wrong:

And this gets all rows with Petrological Analyses = DATING or TSPEC

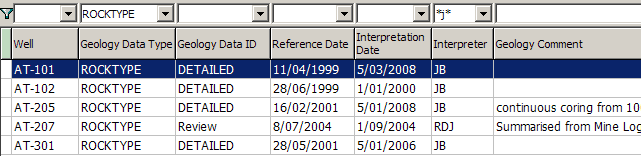
At node Geology: Well Lithology, enter an interpreter's initials to find the interpretations they did:
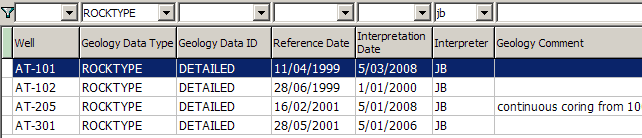
Or enter a letter with wild cards (*) both sides to find all interpreters with that letter in their initials:
A site group is a list of sites:
at chemistry nodes a site group is a list of sample sites
at MT nodes a site group is a list of MT soundings
most other nodes are for wells, where a site group is a list of wells.
They are sites that you are interested in, for example some wells that lie along a fault or chemistry sites along a particular ridge.
To use a site group, first tag some datasets for the sites you are interested in, then save them as a site group. Later, you can load the site group into the filter bar, which filters the datasets to select datasets for the sites in the group.
An example is to create a site group of wells that lie along a fault. Later you can use the site group to select downhole PT measurements for these wells. As you add and delete downhole PT measurements for these wells, the number of downhole PT measurements that the site group selects will change accordingly.
Note: To find if you can greate site groups at a node, look in the P-Tree data for the data set: if Group1 is blank, you can not make a site group.
Navigate to a node that show the sites to put in the group (either the sites themselves or results from those sites), for example to enter a site group of wells either go to Location and Deviation, or to Interpreted > Pressure (because both these are by well).
Tag the data sets for the site group using one of the tools described in this tutorial: scrolling & tagging is good for now. You only need to tag each site once.
Click Filter, then click Save tagged sites to a ... group.
Enter a name for the new group and click OK.
Navigate to the node with data sets to select. For example, you might use a site group of wells at Reservoir > Downhole PT.
Click Filter, then click Use a [site] group to filter your data and click the site group to use. GeoData Manager loads the group's sites into the filter bar to select datasets at these sites. If required, click Tag all to tag the selected datasets.
The Filter menu has options to rename and delete a site group. You can see the datasets in a site group in the appropriate place in the Groups node.
A tag group is a list of datasets of any one datatype. They are datasets that you were interested in once and will be interested in again later. For example, some wells that lie along a fault, or some downhole temperature tests that seem to show convection currents at the top of the liner.
To use a tag group, first tag some datasets, then save them as a tag group. Later, you can load the tag group, which tags the those same datasets again.
Note: You can greate tag groups for most data types. To find out if you can, look in the P-Tree data for the data set: if GroupMany is blank, you can not make a tag group.
Navigate to display the datasets to put into the group.
Tag the data sets for the group using one of the tools described in this tutorial: scrolling & tagging is good for now.
Click Select (Tag), then click Save tagged data to a tag group.
Enter a name for the new group and click OK.
Navigate to the node with data sets to select. For example, to use a tag group of downhole PT tests to select those PT tests again, go to Reservoir > Downhole PT first.
Click Select (Tag), then click Use a tag group to select data and click the tag group to use. GeoData Manager tags the data sets in the group.
To tag more datasets from another tag group, click Select (Tag), then click Add a tag group to the current selection and click the tag group to add.
Note:
The header window shows data sets that are not tagged, as well as the tagged ones. You might need to scroll in the header window to see tagged datasets. Or, to see just the tagged datasets, click Select (Tag), then click Show datasets currently tagged.
If you have used the filter bar to hide some data sets that are in the tag group, then when you use the tag group to tag datasets GeoData Manager will display a warning:
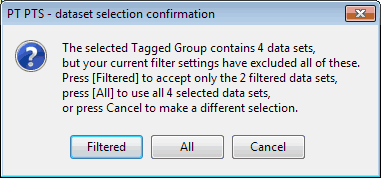
Click [Filtered] to only tag the datasets that are displayed by the filter.
Click [All] to tag all datasets in the tag group, even though the filter is not displaying them.
The Select (Tag) menu has options to display the datasets in a tag group, rename a tag group and delete a tag group. You can also see the datasets in a dataset group in the appropriate place in the Groups node.
Note
Tag and site groups are both just lists of data sets, and are stored at the Groups node without identifying if they are a tagged or filter group. When you are at a particular node, GeoData Manager shows the tagged groups and filter groups available at that node:
If a tag group is a list of data sets that are sites, then at a node showing those sites (either the sites themselves or results from those sites) it can be used as a site group. It will appear in the list of site groups available at that node. For example, a tagg group of wells appears as a site group at Location and Deviation and at Reservoir > Downhole PT.
A site group is a list of sites, and at a node of data sets that are those sites it can be used as a tagged group. It will appear in the list of tagged groups available at that node. For example, a filter group of wells appears as a tagged group at Location and Deviation.
This detail filter selects data sets which have a given detail data field within a given range. It is convenient when there is a large amount of data and other methods of selecting the data would be cumbersome. Typical uses are:
to select data sets within a date range (for example, before using Multiple Graph )
to tag downhole pressure data sets that have a pressure greater than 100 barg.
Before working with the detail filter select the required data type.
In the main menu bar, click View, then click Show the Detail Filter.
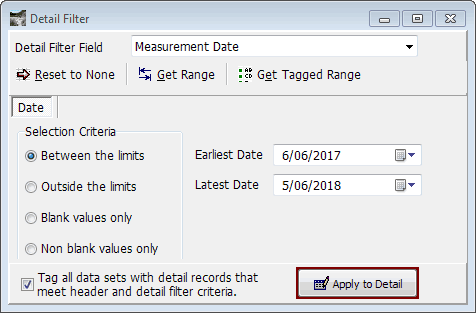
Choose a field in the detail table to select on from the Detail Filter Field dropdown list. Only visible fields (as defined by using the Order button on the Detail Table tab) can be selected. The detail filter displays the Detail Filter Field kind in the top left of the tab, for example Date, Alphanumeric or a kind of number. Note that Time fields are Alphanumeric.
In Selection Criteria, choose options for how to select the data sets:
If the Detail Filter Field is a number or date, enter values for limits in Lower value and Upper value. Then choose Between limits to select data sets whose Detail Filter Field is >= Lower value and <= Upper value. Or choose Outside limits to select data sets whose Detail Select Field is < Lower value or > Upper value.
If the Detail Filter Field is alphanumeric, then choose Not the value or Value and enter the value in Value.
Note you can choose values for Lower value, Upper value and Value from a dropdown list.
Blank values only selects data sets whose Detail Filter Field is empty.
Non blank values only selects data sets whose Detail Filter Field is not empty.
Select or deselect Tag all data sets with detail records that meet header and detail filter criteria. Normally, select it to tag the selected data sets.
Click Apply to Detail to select detail data that meet the criteria. You can now work with the selected data, for example export it or multiple graph.
To close the detail filter, click the X at the top, right. Closing the filter clears the detail filter, so that all data is shown again.
Note:
This detail filter works by temporarily setting the detail data of the not-selected data sets to empty. You can see this by clicking Detail table now and selecting in turn each data set in the header window, you will see only detail data that meets the selection criteria. Normally select Tag all data sets with detail records that meet header and detail filter criteria to tag the selected data sets. However, if you are going to Multiple graph, you can deselect Tag all data sets with detail records that meet header and detail filter criteria and tag all the data sets; Multiple graph will ignore the not-selected ones, which have empty detail data.
| Option | Does |
|---|---|
| Reset to none | Turns off the detail filter |
| Get range | For a Detail Filter Field that is not alphanumeric, load Lower value and Upper value with the lowest and highest values in the data sets For an alphanumeric field, populate the Value dropdown list with the values for the field in the data sets |
| Get tagged range | Same as above, but only uses the data sets that are currently tagged |
Another use of the detail filter is to find data sets to tag. For example, to tag downhole pressure data sets that have a pressure greater than 100 barg:
Navigate to Reservoir: Downhole PT.
In the Detail Filter Field, select Well Pressure, click Between Limits and enter a lower limit 100 barg and a high upper limit, say 1,000 barg; click Apply to Detail.
In the header window, look at each data set in turn and tag the ones that have any detail data showing.
The above tools select data sets of the same data type, which might seem to limit the kinds of data you can output. However, GeoData Manager has many ways to work with data sets of different data types read more.
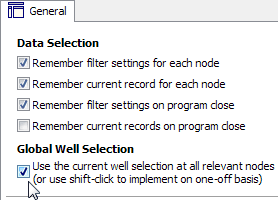
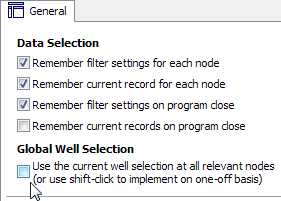
The General settings window has these settings for selecting data sets. Click Settings, then General settings:
Remember filter settings for each node
 If you set up a filter in the filter bar at a node, then if you navigate to another node and back to the first, the filter bar is the same.
 GeoData Manager does not remember filter settings when you navigate away from the node.
Remember current record for each node
If you click a data set at a node to highlight it, then if you navigate to another node and back to the first, the same data set is highlit.
GeoData Manager does not remember which data set is highlit when you navigate away from the node.
Remember filter settings on program close
If you set up filters in the filter bar at various nodes, then if you close and restart GeoData Manager, those filter bars are the same. To tick this, Remember filter settings for each node must be ticked.
GeoData Manager does not remember filter settings when you close and restart GeoData Manager.
Note that if Global well selection is ticked, GeoData Manager will not remember filter settings when you close and restart GeoData Manager, even if Remember filter settings on program close is ticked.
Remember current records on program close
If you click data sets at various nodes to highlight them, then if you close and restart GeoData Manager, the same data sets are highlit. To tick this, Remember current record for each node must be ticked.
GeoData Manager does not remember which data sets are highlit when you close and restart GeoData Manager.
Global well selection: Use the current well selection at all relevant nodes
See below.
Global well selection means that when you use the filter bar to select wells, the same wells are selected at every node that has wells. You can select wells globally in two ways:
Click Settings, then General settings and tick Click Tools, then Preferences and tick Global well selection:
At Reservoir > Downhole PT, click the dropdown list of wells in the filter bar and click AT-102, then click AT-104. These two wells are filtered:
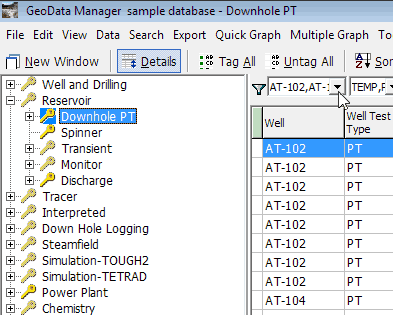
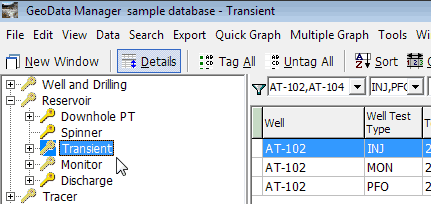
Click another node with wells, like Reservoir > Transient. AT-102 and AT-104 are filtered here too.
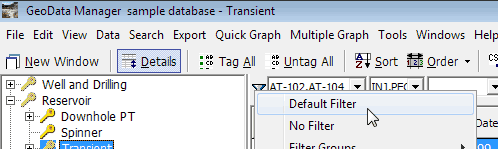
To reset the filter to the default - all wells, click  , then click
 Default filter.
Click Tools, then Preferences and untick Global well selection:
At Geology > Well lithology, click the dropdown list of wells in the filter bar and Shift+click AT-105:
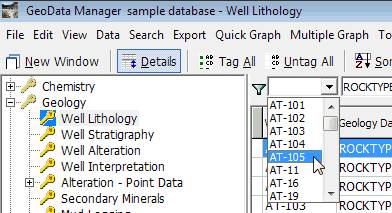
Then repeat and Shift+click AT-101. These two wells are filtered:
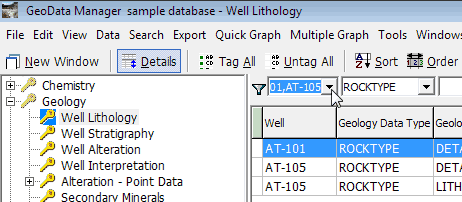
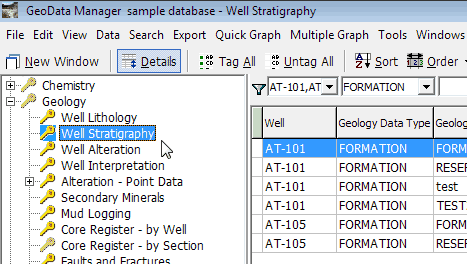
Click another node with wells, like Geology > Well stratigraphy. AT-101 and AT-105 are filtered here too.
To reset the filter to the default - all wells, click , then click Default filter.
Note
If you later click wells instead of shift-clicking them, they will not be selected globally.
If you Ctrl+Shift+click a well in the filter bar dropdown list, it clears any wells already in the filter bar and adds the new well to all nodes with wells.
If you globally select a well that is also a sample site, then the sample site/well will be selected at the fluid chemistry and rock property nodes.