Introduction
Tutorials
Getting familiar with GeoData Manager
Changing how GeoData Manager looks
Scenarios for using GeoData Manager
Data types and nodes
Help with data types and nodes
Getting familiar with GeoData Manager
Changing how GeoData Manager looks
Scenarios for using GeoData Manager
Help with data types and nodes
This tutorial introduces you to the six editing commands, using a downhole pressure test as an example.
Note that you can also enter data into GeoData Manager by importing it.
There are six commands to enter and edit data in a data set:
| Command | Purpose |
|---|---|
| New | Create a new data set of a given data type |
| Append | Append data to an existing data set |
| Edit | Change data in an existing data set |
| Rename | Change the data set's identifiers |
| Delete | Delete the data set from the data base |
| Edit header | Change the data set's header |
To invoke a command:
Ensure you have the required permission.
Select a data type to use. For this tutorial, we will use Downhole Pressure logs: in the database tree click the + in front of Reservoir, click the + in front of Downhole PT and click Pressure Data.
Tip: More generally, choose the data type of the data sets that you want to work with, then navigate through the database tree and click on that data type.
For any command besides New, scroll to find the data set that you want to work with in the header window and click the line.
Tip If there are many data sets, you might use one of the tools for selecting data sets to find the one you want.
Then:
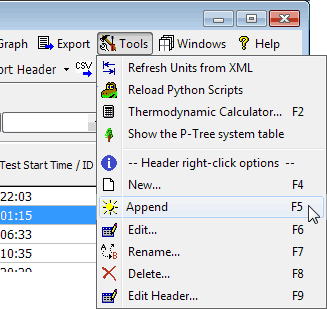
either right-click the line in the header window that you selected (for New, right click any line) and select a command from the pop-up menu:
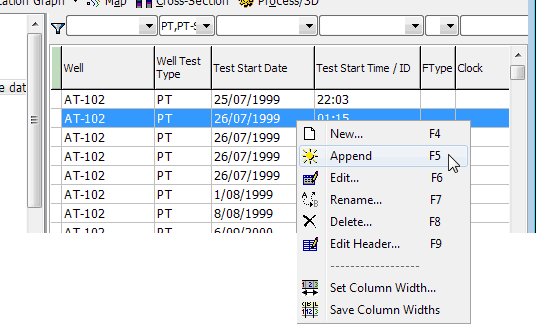
or press the function key shown in the above menu,
or click File and select a command from the menu:
Don't. In these tutorials you will enter data by hand, but normally you would import data from instruments via computer files. Hand enter as little as possible. The tips below apply to imported and hand-entered data.
To select a field to enter data, click the field with the mouse or press Tab one or more times. When the field selected it is highlit.
For some fields you must enter data by selecting it from a drop-down list - this is called a hard lookup read more. Click the  on the right of the field to see the list.
For some fields you can enter data by selecting it from a drop-down list or by just typing it into the field - this is called a soft lookup read more. Click the on the right of the field to see the list.
For any drop-down list, if the list is long, type the first few characters of the value, then choose it from a (smaller) drop-down list.
To enter a very big or small number you can type e after a number, then a power of ten. For example, to enter 200 you can type 200 20e1 2e2 or 2000e-1.
For chemistry measurements, you can enter a - or a < in front of the value to indicate it is a detection limit, for example < 1 ppm read more.
GeoData Manager stores stores numbers internally in SI units. If you enter a number as 1000 ft then it normally displays as 1000 ft. However, if you click on a box containing the number you will see the full precision number that is actually stored, 999.9999999986866 (an insignificant difference).
You can change how numbers are displayed read more.
If the value is very small and shows as 0, turn on Tools: Accurate Cell Edit and click the field to see the value.
Fields have different colour backgrounds:
White: You can enter data into the field.
Light blue: You can not enter data into the field here.
Light yellow: Data calculated by GeoData Manager (usually after Apply, Process or Save; these are explained later).
Many data types require a site to be entered before you can enter data for the data type. For example, you must have entered data for a well before you can enter downhole tests for the well.
Field instruments often produce many values: temperatures every few centimeters down a well or pressures a few seconds apart. Measurements this close are usually redundant, and too many measurements will slow down GeoData Manager. In these cases, consider thinning the values so that each data set does not have more than one or two thousand measurements.
A date and time field are usually paired. You can enter the date in the date field and the time in the time field. Or you can enter both a date and time in the date field.
To enter a date in a date field:
to see a built-in calendar to choose a date23/5/2017.Valid dates follow the short date format selected in Window's control panel region and language, for example d/m/yyyy or m/d/yyyy. Also, you can just enter the last two digits of the year. GeoData Manager displays the date in the short date format.
To enter a time in a field:
Valid times are h, h:m, h:m:s. GeoData Manager displays the time in the long time format selected in Window's control panel region and language.
If you enter both date and time in a date field:
Test start date & test start time/ID GeoData Manager leaves the time in the date field and uses it for time calculations. You must enter something in Test start time/ID: enter an ID.
Measurement date & measurement time when you finish editing and click Check, Apply or Save, GeoData Manager moves the time from the measurement date field to the measurement time field.
Sample date & sample time/ID GeoData Manager leaves the time in the date field and uses it for time calculations. You must enter something in Sample time/ID: enter an ID.
If you enter a time in both the date field and the time field, GeoData Manager uses the time in the date field.
Import: When you import data, a time can be in a date field or in the paired time field, as described above.
Create a new data set of a given data type.
Select the data type to use (downhole Pressure Data for this tutorial) and invoke New see how.
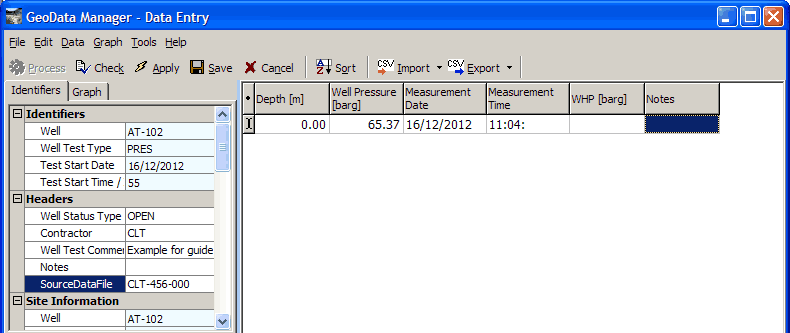
The Identifiers window appears:
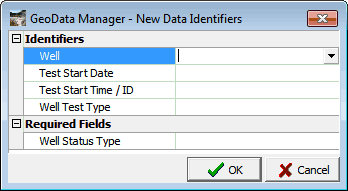
Enter this data:
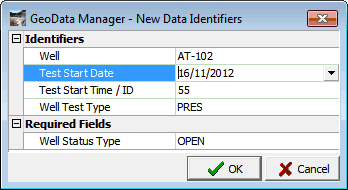
Note
Test start time/ID.Required fields in this window see how.Click  . The new data set window appears:
![]()
This has the identifiers you just entered at the top right, the header data on the left and the detail data on the right. To change the identifiers, use Rename.
Enter this header data and the first row of detail data:
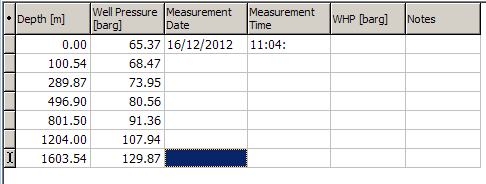
To create a new, empty row after the bottom row of the detail data, click anywhere in the bottom row and press the Down arrow key. Now enter the rest of the test results into the detail data:
Add an empty row to the bottom: Click anywhere in the bottom row and press the Down arrow key.
Add an empty row within the list: Click the anywhere in row to insert the new row above and press the Insert key.
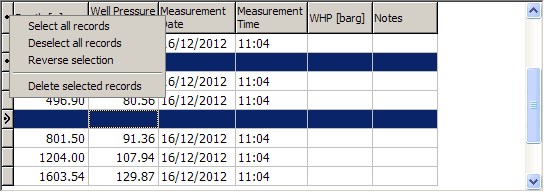
Delete rows: Click the grey box in front of each row to delete. The box gains a black dot. Right-click the black dot to the left of Depth and click Delete Selected Records:
The commands in this menu bar are an appropriate subset of the home window commands, plus commands for working with data:

| Command | Does |
|---|---|
| Accurate cell edit | Toggles between showing values in a field to the default precision, or to full accuracy; useful if the value is very small and shows as 0 |
| Reverse Layout | Swap the header and detail tabs to the other side of the window. |
| Ditto | Copy data into the selected detail field from the field above. |
| Column Fill | Fill in incrementing values in the column below the selected detail field. You can set a start value and increment. |
| Column Empty | Deletes all data in the selected detail column. |
| Relative Shift Down | Add a row to the detail data, then the move the selected detail field and all fields below it one row down. Use this after you enter a column of data into the wrong rows. |
| Relative Shift Up | Move all fields below the selected detail field up by one row, overwriting the selected field. Use this after you enter a column of data into the wrong rows. |
| Empty Worksheet | Delete all the detail data. |
There are two tabs at the top, left of the window:
Normally use the Identifiers tab to work with the header data.
Click the Graph tab to display a graph of the detail data:

If your graph does not look like this, then change it.
For some data types, the  button is available (not greyed out). Click this to carry out some specialised calculation for the data set.
For example, button is available while working with a cross section. When you click this, GeoData Manager asks for a maximum distance from the cross section; then it assigns to the cross section wells that are within this distance of the cross section.
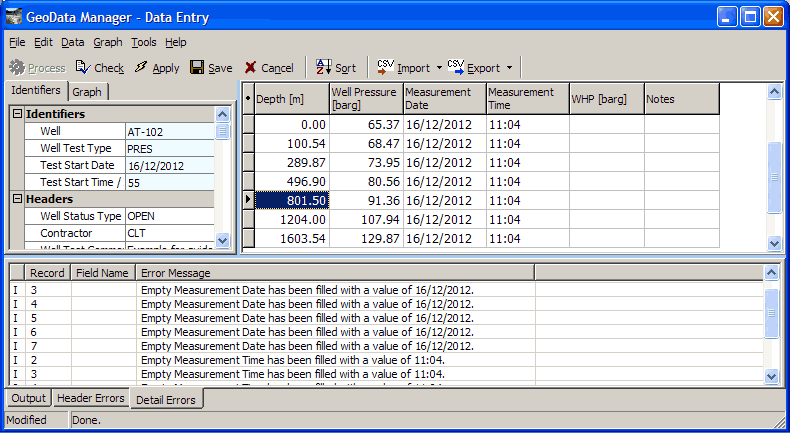
Click  for GeoData Manager to check the data you have just entered:
If it finds an error it will display an error message and show the error in one of the tabs at the bottom of the window. Errors have an E at the start.
It it wants to tell you something about the data it displays a message in one of the tabs at the bottom of the window. These have an I at the start.
Note:
GeoData Manager uses the measurement date and time you entered into the first detail line for all lines. You can overwrite these if you want:
Click  forGeoData Manager to calculate any data from the data you have just entered. In this case there are no such calculations. However, for chemistry data there are many such calculations, for example TD values, Water Total Cations, Water Total Anions, Water Total CO2, Molar ratios.
Normally just click  after you have entered or edited a data set. GeoData Manager automatically performs a Check and Apply. If there is a problem with the data it will display Dataset or Header messages at the bottom of the window and not save the data until you have corrected it.
GeoData Manager then saves the data set you have just entered and returns to the home window.
To ignore the data you have just entered and return to the home window, click  .
.
Append data to the end of an existing data set, but not change the data already there. This is faster than using Edit if the data set has a lot of data:
Select the data type and data set to use and invoke Append see how.
Proceed as for entering a new data set. You can only change the header data and add to the detail data (yellow background) You can not change existing detail data (blue background).
Note:
To change data already in the data set, use the Edit command.
To change just the header data, use the Edit header command.
To change the identifiers, use the Rename command.
Change data in an existing data set:
Select the data type and data set to use (downhole Pressure Data for this tutorial) and invoke Edit see how.
Proceed as for entering a new data set. Type any new data over the old.
Note:
To change just the header data, use the Edit header command.
To change the identifiers, use the Rename command.
Change the data set's data identifiers and required fields.
Select the data type and data set to use (downhole Pressure Data for this tutorial) and invoke Edit see how.
Change the data and click .
Note
Test start time/ID.Delete the data set from the data base.
If the data set is used by another data set, then you can not delete it until you have deleted the other data set. For example, you can not delete a well if there is a downhole test for the well.
Change the data set's header:
Select the data type and data set to use (downhole Pressure Data for this tutorial) and invoke Edit header see how.
Change the data and click , , or .
Note: To change the identifiers, use the Rename command.
Delete the downhole pressure test you created at the start of this tutorial.